I recently came across Codesmith and .netTiers. It’s one of the best things to happen to me since i started working in VB.NET. You can view the details of what these two are in their sites. Here’s the gist:
Codesmith is an engine for creating code dynamically based on templates. It saves time. .netTiers is a template for Codesmith which creates code for handling SQL Server databases. It creates classes for performing DML (and other operations) on all database tables. This is done by creating collections. You can use it as simply as a collection!
Now, the tutorial I tried to learn from - their official one - is incomplete! Put simply, it doesn’t work. So, I decided to write my own.
Tutorial
- Download Codesmith trial and .netTiers. Install them!
- Open Codesmith Explorer from the start menu.
- Click on Open Folder button in the toolbar and navigate to the Templates folder in the location where you installed .netTiers.
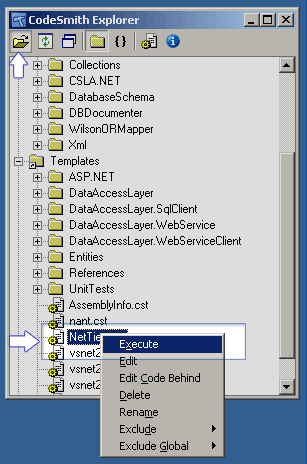
- Right-click on netTiers.cst file and Execute.
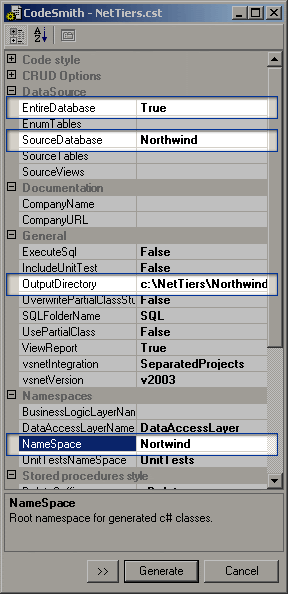
- Select the database (refer to the screenshot below).
- Set Entire Database to true.
- Select Output Directory.
- Set a namespace name.
- Generate!
- If all goes well, you’ll have a new solution in the folder you selected as output directory. Open the solution. You’ll see that it has three projects. All three set to produce DLLs.
- Now add another project to the solution. This can be a C# or a Vb.NET project. I’m using VB.NET. I’ve named it NorthwindFront.
- Add a new item to the project. Select Application Configuration File as the type. It’s called App.conf by default. Leave it as it is.
- Open Enterprise Library Configuration from .netTiers program folder in the start menu.
- Click on Open File and select the App.Conf you just created.
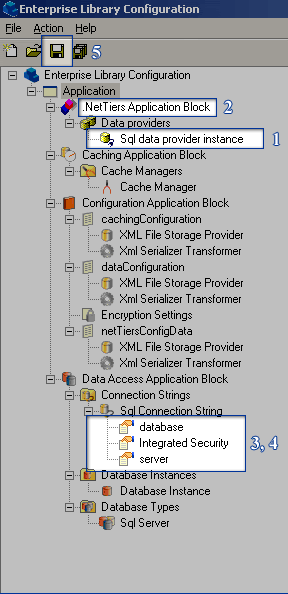
- Right-click on Application and click netTiers Block from New submenu.
- Set these properties. (See screenshot for reference.)
- .nettiers Application block > data providers > sql data provider instance > DataBase instance: Database instance (select from drop down)
- .nettiers Application block > cache manager : cache manager (select from drop down)
- DataAccess application block > connection strings > sql connection string > database > value : [name of database] I used Northwind
- DataAccess application block > connection strings > sql connection string > server > value : [name of sql server machine] I used (local)
- Save the file. If there’s an error, restart. If it still doesn’t work, post a comment and tell me what it says!
- This generates some *.conf files in your project directory. Go there and copy all of the *.conf files to your bin directory.
- That concludes the netTiers part of the tutorial. That’s all you need to do to set netTiers up. Now, you need to see how to use it.
Here’s a project I created while learning to put this netTiers to use. It’s pretty basic but does all three DML operations. To run it, you need to have SQL server running on (local) with the default Northwind database using Integrated Security for login. To change these settings, see the last section of this tutorial.
Run this project and try these tasks:
View the list of Employees. Try typing a name in the text box to see dynamic searching in action. You can also use up, down, page-up and page-down keys in the textbox for navigation.
Enter new employees. (Just enter the values and click on Add.)
Modify past records. This is the most functional part. You can enter an ID in the ID field and hit enter to load that record in the boxes below. If that ID doesn’t exist, you’re shown the view box in which you can select an employee and hit enter to load that.
Changing SQL server database and server
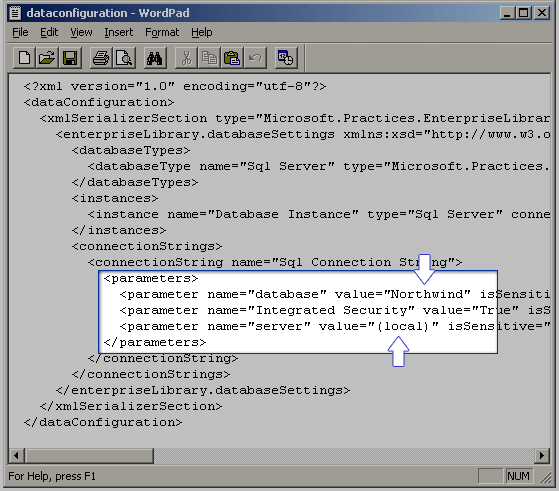
If you want to change these settings, open up the DataConfiguration.conf file from your bin folder and edit the settings. (See screenshot.)
If you download the project and try running it, you’ll notice that it doesn’t work! This is because of the way references are created by netTiers. Here’s what you need to do to fix it. I know this isn’t the right solution. I’m trying to get to do this properly. If you find something, do leave me a note.
- Open the solution. Open the Properties of the Northwind.DataAccessLayer project.
- In the References Path section of Common Properties, change the path to [$YourSolutionPath]/References.
- Do the same for Northwind.DataAccessLayer.SqlClient project.
- Compile/run the project.
If you find something wrong and/or missing in this tutorial, please let me know.