I have tried, on multiple occasions, to write an eclipse plugin. I always gave up in the middle of the process though, what with the different versions of eclipse floating around and the discrepancies between the tutorials and the version I was using. I finally decided to sit down and go through a simple ‘hello world’ plugin and write a tutorial in the process to guide those that are using the latest eclipse. This is a tutorial for eclipse 3.5 (galileo) and is a no BS tutorial with little or no explanation. That’s because I believe in code first, think later approach when learning new technologies. So, download eclipse SDK version (not the Java or the C/C++ version) and read on.
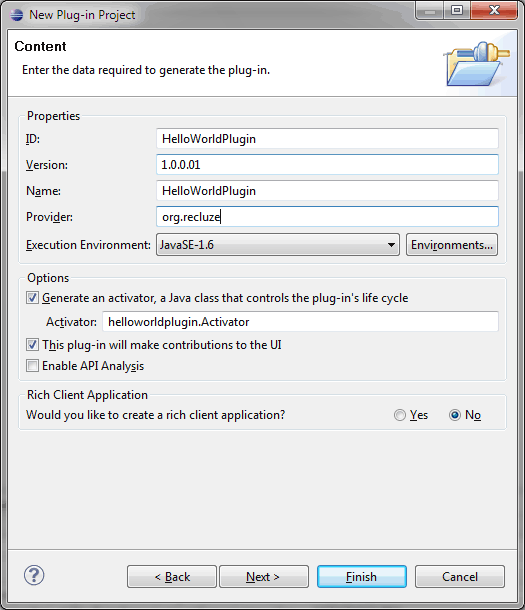
First, create a new project of type ‘plugin development’. If you don’t know what that means, try finding a basic tutorial for using eclipse. The following screenshot shows the options you need to set for the plugin project. (Click to enlarge.)
And
When the project is created, you’ll see the manifest file in the main editor view. (If you don’t, just click on it in the manifest project in the project explorer.) See the different tabs in the bottom of the view.
In the ‘Extensions’ tab, you’ll see the ‘All Extensions’ pane. Click on ‘Add’ and search for ‘actionSets’. You need to create an extension of type ‘org.eclipse.ui.actionSets’. This basically allows the plugin to extend the basic eclipse interface (i.e. a menu in our case).
Right-click on the actionSet just created and create a new ‘menu’. (You would probably want to change the properties, especially the name, of the actionSet in an actual project.)
Then, under the menu, create a new separator and give it a name. This will allow the placement of a menuitem later on.
Create an ‘action’ type under the actionset similar to the menu item. This will be the actual item that we can click on in the menu. Once you do that, give it a proper name and click on ‘class’ in the properties pane. This will allow you to associate a class with this action item. (This should remind you of action listeners but this is a lot more dependent on eclipse plugin architecture.) Give the class a name and place it in your package.
Now, finally, for some code. Open the class you just created and you’ll see that there is some placeholder text inserted in. (Not going into the theory of what this actually is and how it works. Code first, think later!) Here’s the code. I’ve formatted the additions you need to make in a bold, blue typeface here.
` public class HelloWorldAction implements IWorkbenchWindowActionDelegate { IWorkbenchWindow window; @Override public void init(IWorkbenchWindow window) { // TODO Auto-generated method stub this.window = window; `
` `
}
@Override
public void run(IAction action) {
// TODO Auto-generated method stub
MessageDialog.openInformation(window.getShell(), “Hello world”, “Hello world! I am a new plugin!”);
` }`
And running the plugin is easy. Right click the project, Run-As and ‘Eclipse Application’.
Finally, to deploy the project, just go to ‘File’ -> ‘Export’ and select ‘Deployable Plugins and Fragments’. Just give it an archive name and you will have a zip file that can be extracted in any eclipse directory to incorporate the new plugin in that project. You can also export it to a repository but that’s another story. Last, but not least, see the screenshot and marvel at what you’ve done.
What’s next? See this tutorialon how to create an RCP application in eclipse. Maybe someday I’ll write one of those too.


